Technique for proper closure of pocket
Closure of Pocket
Correct technique and attention to detail is essential in closure of pocket to ensure a long lasting trouble free implantation and make the subsequent box changes straightforward
Introduction
The gateway to the device pocket is the skin incision and subsequent incision of the various tissues layers the pre-pectoral zone. As described in the section on regional anatomy, the layers of the incision are (from superficial to deep) skin, subcutaneous superficial tissues & the deep fascia.
Therefore on closing the pocket, these layers need to be sequentially closed without disrupting their layered nature. In other words, each layer has to be sutured separately.
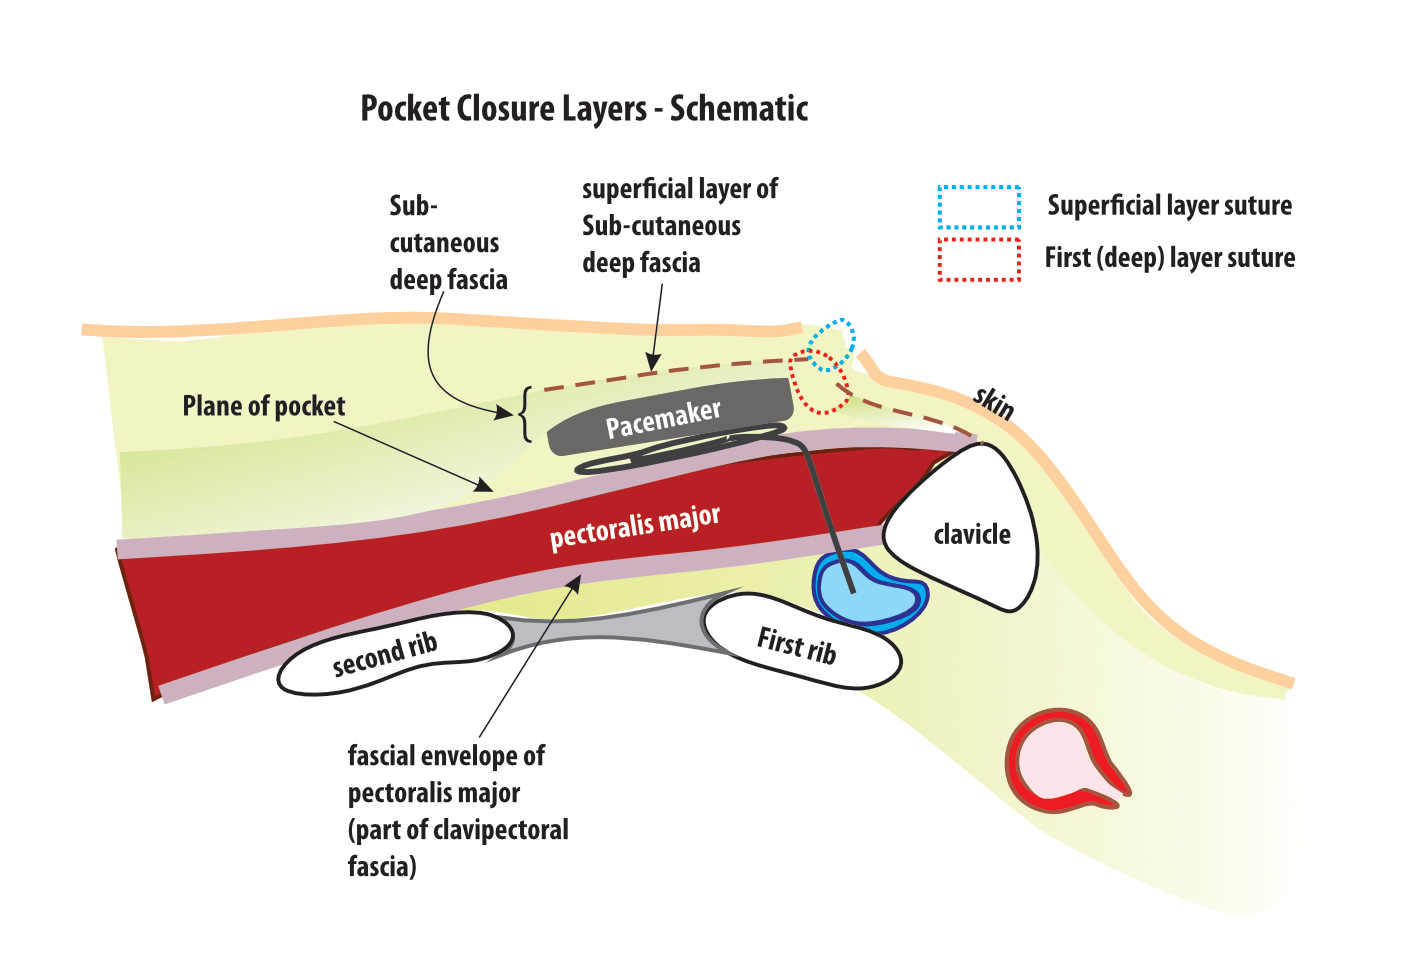
Figure : Schematic of pocket incision and layers for suturing – The first layer (red dotted line) incorporate the deep fascia (along with its fibrous superficial component). This layer provides isolation to the pocket and restores anterior wall structure and helps prevent future device erosion. The superficial layer (blue dotted line) predominantly encompasses the subcutaneous tissues – this gives support and helps take off the tension from the overlying skin.
Except for skin, the other layers are closed using absorbable sutures. Skin closure can be performed in many techniques based on need for cosmesis and wound security. Skin closure is discussed elsewhere. The primary goal of closing the deeper layers is to restore the anatomical wall of the region of incision.
Vicryl is the commonest used material and dexon is an alternative. Unless the device is very big (e.g. ICD) or the patient is very thin, the tension on the tissues of a pacemaker pocket is minimal. (provided the pocket size was adequate). Hence tight suturing is not necessary and approximation of the layers in two running rows of continuous suture is all that is necessary.
Blunt tipped round bodied needles are preferred as they are less likely to damage the insulation of the lead if accidentally pricked.
In both layers, the adjacent bites should be of equal size. If the bites are unequal, the layers will get approximated crookedly and there will be problems of cosmesis when the skin is sutured.
The suture it self is a running continuous suture. Avoid using interrupted stitches for the first layer as pocket closure may not complete.
First layer
This involves suturing the deep fascia. Usually this is a thick discreet layer of fatty tissue which was dissected off the clavipectoral fascia covering the pectoralis major muscle (i.e forming the anterior flap of the pocket). As the first layer to be sutured, it provides isolation to the pocket. As shown in the demonstration videos, generous bites are taken to ensure that the layer is closed well. At times, the fibrous layer of the deep fascia is seen as a sharp edge along the incision line and if seen, the needle bites should incorporate this fibrous layer too.
As said before the most vital role of the first layer is pocket isolation. Out of it, isolation of the sleeves well into the pocket is achieved by this layer and particular attention should be paid to ensure that the sleeves are well covered.
Deep bites are necessary to encompass this layer. Deep bites not only facilitate good approximation, it also prevents delayed bleeding as this is the most vascular layer of the pocket. Somewhat closely spaced bites are necessary to ensure pocket isolation but again they should not be too tight. – too many bites or too tight bites will traumatize and lead to ischemia of the approximated edges leading to poor wound healing.
One should be aware of the closeness of the needle to the leads / sleeves when suturing this layer and all bites should be taken under direct visualization or with measures not to damage the leads. A prick on the lead can easily damage the insulation. Blunt tipped round bodied needles are preferred as they are less likely to breach the insulation if accidentally pricked.
Second Layer
After the first layer is completed, the suture direction is reversed and the second layer is sutured in a similar manner but taking bites more superficially. The role of this layer is to provide a firm foundation for the overlying skin. It helps to take tension off the skin suture and help it heal well without scarring too much. ( Lateral tension on the skin edges will lead to a wider / thicker scar later ). Equal size, neatly spaced bites are necessary to prevent distortion of the final skin layer.
At times, if the pocket wall layers are very thick (e.g. obese female), additional stitches may be necessary approximate the wound edges neatly. Regardless, over-zealous suturing should be avoided – as all retained suture material increase the risk of infection.
Tip : Injection of 10-15 ml of 0.25% bupivacain primarily along the edge of the wound – especially if the procedure took a long time helps post operative pain minimization and this in turn helps early ambulation of the patient.
Video Demonstration
Video : Closure of Pocket