Technique of creating an optimal pocket for pacemaker implantation
Incision and Creation of Pocket
Planning of Incision
Recap : Anatomical considerations before making an pocket : See here
The pacemaker pulse generator (the ‘Device’) is usually placed in the pectoral region, in a pocket created under skin.The floor of the pocket is the fascia covering the pectoralis major muscle (part of the clavipectoral fascia) and the roof of the pocket is formed by deep layer of the deep fascia. This pocket is also referred to as the “Pre-Pectoral Pocket” as the pocket lies on the pectoralis major muscle. It is important to understand and identify these fascial layers as they are the principle support of the device pocket. Proper closure of the fascial layers helps in excellent healing with good long-term outcome and device stability.
The device can be also placed deep to the pectoral muscle (sub pectoral pocket) and this is explained later. The vast majority of pacemakers can be placed in the pre-pectoral position with excellent cosmetic outcome. Sub pectoral pocket creation is technically challenging, but may be required when the device – tissue ratio is larger for example when placing an ICD in a child. (there are other locations such as sub-mammary, abdominal etc.. but that’s a separate topic)
There are two ways of making the incision
- Incision made parallel to the clavicle
- Incision made in a curvilinear cut following the skin crease.
My original technique of incision is was usually made parallel mid part of the clavicle, 2 finger breadths below the clavicle and is about 5 cm in length, incorporating the guidewire at its lateral end. If the puncture was very medial, the incision may be done to have the wire in its mid part rather than lateral end.
It is important to avoid being too close to the calvicle as the device may impinge on it when the patient starts moving his hand. Some prefer to make the incision horizontal to the chest in keeping with the Langer lines – however with a horizontal incision, one may come too close to the calvicle at the medial end or would require tunneling of the wire to make it come out of the pocket.
Now my preferred way of making the incision is to follow the skin crease lines as depicted below . This incision heals with a better scar compared to the other technique. Its basically a modification of the skin incision used for cephalic cut downs – but a little medial to the cut-down incision as we need to directly reach the main vein. Since this incision is curved, its best to make the incision, make the pocket and then do the vascular puncture through the pocket rather than first do the puncture. The curved nature of the incision makes it a hassle to do it with a wire poking through the skin and.
The incision is usually centered slightly medial to the center of the delto-pectoral groove – but the length and deciding the ends of the cut takes some practice. If the incision too infero-lateral (i.e. away from the vascular entry target site) you may have difficult in reaching the correct plane with the puncture needle. In such cases a slight medial extension of the medial edge may be necessary to avoid struggling in finding the vein. Even if the incision is too long, scarring is minimal here – so its unlikely to be of a cosmetic concern.

Figure : Technique 1 for skin incision. This is suitable when the vascular access has been done through the skin – especially if the access is lateral and fairly close to the clavicle (i.e. superior part of the deltopectoral triangle). As described the lateral end is at the puncture wire or incorporates it slightly
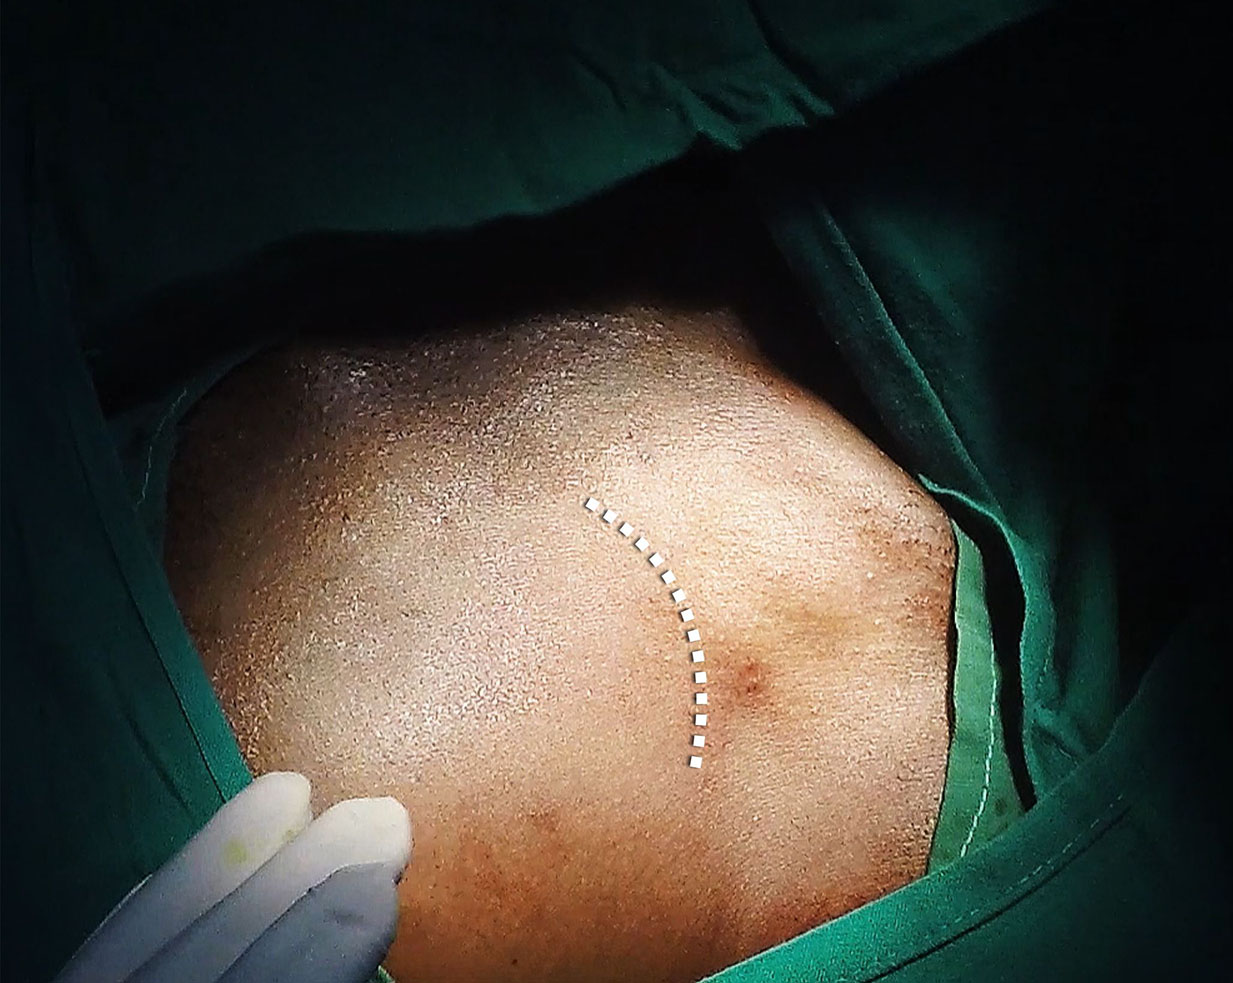
Figure : Technique 2 for skin incision. This not suitable when the vascular access has been done through the skin. The curved line follows the skin tension lines and results in a good cosmetic outcome. However as it’s a curved incision, the puncture needle has to be placed through the pocket after it has been created. The pocket edges should be well retracted with a self retaining tractor to gain access to the floor of the pocket to do the puncture.
Apart from the good cosmetic outcome, the other main benefit is that the curved incision tends to “cover” the lead sleeves well. The parallel incision is close to the clavicle and this may bring the incision directly above the lead sleeves. (The importance of covering the lead sleeves is discussed elsewhere – but the main point here is that they represent a significant proportion of lead erosion related problems)
In women, it may appropriate to avoid being too medial as female dress patterns may reveal the scar. Extreme laterality also must be avoided as the device has minimal support and may migrate or it may interact with the shoulder joint movement in a thin patient.
Local Anaesthesia
Local anaethesia should be infiltrated along planned skin incision line starting from the wire entry point. A fairly large needle (green) can be used to inject the drug provided that the initial needle entry is near the vicinity of the wire entry point which was previously anesthetized. Anaesthetic infiltration zone should extend about 2 cm beyond the planned lateral and medial incision endpoints. Two passes may be necessary to provide adequate skin and deep tissue coverage. Usually the initial infiltration for the puncture would render this injection relatively pain free. Depending on the patient size, about 10 ml of 1% solution will be necessary – The aim being blocking the incision skin and supra-clavicular nerves. About 2 ml can be injected deep along the wire track taking caution not to enter the vein. This helps to prevent pain when sheaths are inserted later on.
Once the incision line has been infiltrated with local anaesthetic, further infiltration along the pocket margins (medial and lateral) are done to provide additional blockade to the future pocket. About 2-3 parallel injections would suffice (see video below) requiring about 15 ml 1% solution. Slow but firm massaging the infiltration zone helps deeper dispersion and 1 minute is allowed for the anesthetic to act. Keep about 5 – 10 ml available to be injected through the pocket at a latter stage (Click here for a Detailed discussion on Local Anaesthesia)
VIDEO : Recap of Local Anaesthesia before Puncture : About 10 ml of 1% lignocaine is injected under skin in a triangular area in which the base is the clavicle and apex is just distal to the skin puncture side. Gentle massaging of the area helps dispersion of anaesthetic. Note : Sedation should be in place before this is performed.
VIDEO: Local Anaesthesia to Skin Incision and Pocket : Local is injected along the future incision line and along the lateral borders of the pocket. Additional doses may be injected along middle of the future pocket to ensure complete anaesthesia of the pocket.
Incision and Dissection
The incision is done as planned using a No. 22 or 11 G surgical blade with a single stroke. As far as possible the initial skin incision should be done with a single stroke without damaging skin edges with multiple strokes which may lead to scarring.
For pacemaker implanters, it’s good practice to get use to using shallow force to cut the skin this usually means the dermis may not get separated necessitating a further cut. This additional cut can be done by reversing the blade and cutting from deep to superficial :
- The requirement for shallow cuts is mandatory when doing re-operations (e. g. box changes, lead revisions ) as one never knows how close the underlying lead / device is to the skin.
- In thin patients, attempting a deep single cut may damage the fascial envelope of the pectoralis major muscle leading to troublesome bleeding (oozing) from the raw edge of the muscle.
The dermal separation has no outcome on the final cosmetic result as long as the epidermal separation was neat.
Once the skin incision has been done, if a large pocket is anticipated (e. g. ICD) additional local anesthetic drug is injected to the depth of the pocket. Its not necessary to inject along the whole line of incision: deep and generous injections along the lateral and medial borders of the future pocket would be sufficient as dictated by anatomic principles. Indiscriminate injection to the pocket should be avoided as this distorts pocket tissue planes and predisposes to local anaesthetic overdose.
Creation of Pocket : Essential Points
Once the pocket has been created, any bleeding points should be controlled using either diathermy or suture ligation. Indiscriminate diathermy should be avoided as charring and coagulum formation in the pocket is undesirable. The author does not use diathermy to dissect tissues. (However this may change in the future with the availability of Medtronic’s Plasma Blade which does minimal thermal collateral damage)
Once the pocket is done, adequacy of the size should be assessed. This is conveniently done by inserting fingers and assessing : Two fingers would be adequate for a standard bradycardia pacemaker and three fingers for an ICD. With regard to manufacturer variance of pacemakers, Medtronic has the smallest devices whereas St Jude devices are wider but thinner. Vitatron and Sorin have similar profiles to Medtronic. Biotronik are in between (Author has no experience in implanting Boston Scientific / Guidant devices). The implanter should gain familiarity with the device profiles available at his institution.
Once the incision has been made, dissection of the fascial layers is done to reach the pectoralis muscle surface. Care should be taken not to breach the fasical envelope of the muscle (clavipectoral fascia) as troublesome bleeding can occur if the muscle substance is cut. To dissect down, the author prefers using a sharp fine scissor to cut in layer by layer while holding the anterior flap taut with a hook. This technique is especially useful if there is no assistant. The absolute requirement is a sharp pair of scissors !
Upon visualizing the muscle, dissection now extended caudally to create a small gap between the muscle and the anterior pocket flap. A finger then inserted into this gap and blunt sweeping is done to separate the anterior flap further down from the muscle thus creating the pocket space.
Upon visualizing the muscle, dissection now extended inferior to create a small gap between the muscle and the anterior pocket flap. A finger then inserted into this gap and blunt sweeping is done to separate the anterior flap further down from the muscle thus creating the pocket space. If one is in the correct plane (i.e. in the loose deeper layer of the deep fascia), this finger dissection would be easy and bloodless. This plane is quite thick and readily achieved in women but may be difficult in thin men. If the pocket is made on the correct plane, one would see the pectoralis muscle (covered by it’s fascial envelope) lying on the floor of the pocket.
Although it may sound unkind, pain on injecting anaesthetic deep into the pocket suggests that there are sensitive bits remaining which need to be anaesthetized and is a marker of good anaestheisa during further deepening of the pocket. If not sedated, I always warn the patient when I am injecting deep into the pocket as its not usual to find a patch of pocket un-anaesthetized.
Tip : The most uncomfortable part of a pacemaker implantation is the creation of the pocket. That’s why I advocate a good bolus of short acting sedation at the beginning – just sufficient to cover the pocket creation. Experience will tell you despite the most meticulous anaestheisa, patients feel pain when deepening the pocket – especially when large devices like ICDs are implanted. It makes much more comfortable for the patient and makes the operator’s life much easier by having sedation on board during the pocket creation (more information here)
The final step in creating the pocket is to separate the guide-wire from the skin edge, well up the floor of the pocket. (i.e. the guide-wire should be coming out from the pocket floor rather than the incision edge. This is a critical step to ensure that the future lead is well away from the incision margin. (Author has seen several cases of lead sleeve erosion resulting from inadequate depth of lead from the skin incision)
Creation of Pocket : Guided Videos (Please watch in HD and pause when necessary to view captions)
Once the guide-wire is made to come out of the floor of the pocket one may proceed to create additional punctures for additional wires if a multilead device is planned or proceed to insertion of sheath for single lead device. If muliple leads are necessary, additional axillary vein punctures are done through the pocket following the existing wire keeping few millimeters gap in-between the wires. Another method is to double wire (piggy back technique) the existing wire and insert additional wires – all of this is explained here in the section of multi-lead device vascular access.
Before proceeding for sheath insertion, a dry gauze swab is kept deep within the pocket to soak up delayed bleeders. It is imperative that the insertion of this swab is coordinated with the assisting nurse and ensure that it is removed before the device is inserted to the pocket. However trivial it seems, in obese patients and with deep pockets, the swab can be easily forgotten and left inside !!